A couple years ago, my friend Chad taught me a very useful trick in Final Cut Pro. We were both using FCP 7 at the time, though I have since moved to FCP X (an essential part of this story that I’ll get to in a bit). This was when I was still pretty new to video editing, having had other people edit my films up to that point. I shot one particular video for a charity organization and there were some shots that weren’t framed very well. Unfortunately, I shot the footage at the same resolution that I was going to output the final video in – standard definition.
Now any of you who are experienced video editors are already thinking, “WTF? Why did you do that?” Well, I assumed that since the final video was meant to go on DVD, I should just shoot and edit in SD.
But as Chad explained it to me, I should always shoot at a higher resolution than what I’m going to deliver on when possible. Then, when I have a shot that isn’t framed well, I can fix the framing during editing, without any loss of image quality. In my example, the end product was going to be 720×480, but if I shot at 1440×1080, then I can pick and choose which pixels are going to be thrown out to downscale the image. This is a way of improving the framing up or down or left or right, but the trick can also be used to zoom in a little, or – by using keyframes – to fake a dolly push. If you don’t have more pixels than you need, then if you want to zoom in a little, you’re forcing the editing program to make up pixels, and of course since it can’t invent data that’s not there, it has to guess, and that means something that doesn’t look crisp.
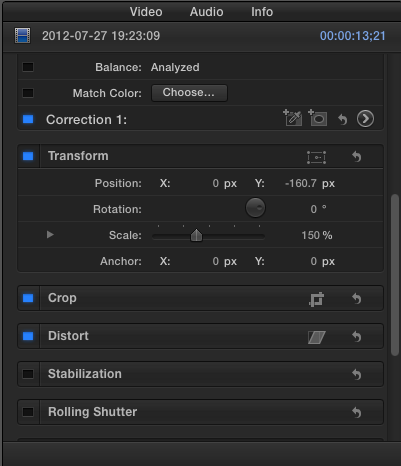
As I learned the trick from Chad, you can also use this to add interest to a single static shot of someone talking or doing a presentation or whatever. If you intersperse cuts from fully wide (100%) to a bit tighter (150%) then you can cover up cuts you’ve made to remove mistakes in a performance while also adding some visual interest to the video.
Here is a video by David Acampora explaining how to use this technique in Final Cut Pro 7: http://www.youtube.com/watch?v=kQbphjrRNPY
But when I switched to Final Cut Pro X, I was confused for quite some time about how to do the same thing. You see, when you’re editing bigger clips on a smaller timeline, FCP X automatically scales the footage to the timeline window and calls that “100%” even though you know you’re really seeing only 66% (or something like that) of the pixels. You can do a fake zoom in FCP X by editing the Scale parameter of the Transform section of the Video tab of the Inspector window (whew, say that fast!) to something greater than 100%.
But it wasn’t clear to me if Final Cut Pro X downscales my footage first (to match the project properties – the timeline resolution) and then zooms in (interpolating pixels where there aren’t any), or if it’s smart enough to zoom in and then downscale (in which case there may be no interpolated pixels). And so for the last year I’ve been avoiding this technique as much as possible. You see, I paid for an online training class in FCP X from Ripple Training when I first decided to take the plunge to the new version. The training was great, but they didn’t cover this topic.
About a month ago, though, I subscribed to an email list from a video expert named Larry Jordan. He does a video blog series, a written blog, training videos, and lots more. The guy knows it all. So I decided to ask him about this earlier today. He immediately wrote me an email back filling in the missing gap in my knowledge. Here’s the trick in FCP X:
- Select the clip that’s bigger than the resolution used for the project
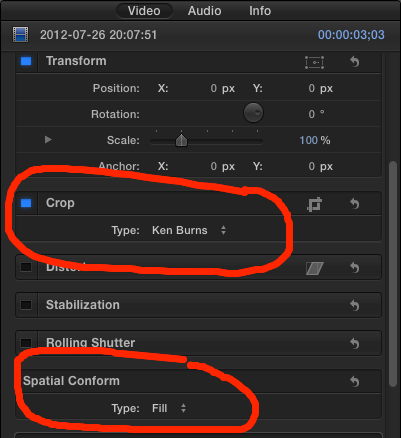
- Go to the Inspector and change Spatial Conform
- Then use the Ken Burns mode in the Crop menu to move the image around however it looks good
Larry suggested changing Spatial Conform from Fit to Fill, but I found that there’s also the None mode which seems to give me all the pixels in the raw clip to play with. I didn’t even know about the Spatial Conform menu before. So now I have something new and cool to play with. Thanks, Larry!

